Welding symbols offer a visual shorthand for describing the type, size, and other specifications of a weld. However, deciphering these symbols can be a challenge for those new to the field. In this article, we’ll focus specifically …
Welding symbols offer a visual shorthand for describing the type, size, and other specifications of a weld. However, deciphering these symbols can be a challenge for those new to the field. In this article, we’ll focus specifically on how to read weld size on a welding symbol.
Welding symbols are a critical part of the communication process in welding and fabrication industry. They are graphical representations that communicate detailed specifications about the weld, such as type, size, and other relevant information.
These symbols are universal and standardised according to the American Welding Society (AWS) for clarity and ease of understanding.
How to Read a Welding Symbol
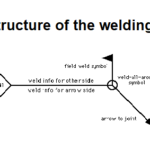
A basic welding symbol consists of a reference line (horizontal line), an arrow, and a tail. The arrow points to the location where the weld needs to be made. The tail, which is optional, is used to denote supplementary information such as the welding process, specifications, or other instructions.
The reference line is the most critical part of the welding symbol. It contains all the necessary information about the weld. The side of the reference line where the arrow is pointing is known as the arrow side, and the opposite side is the other side.
Weld size is usually indicated on the reference line. The way it’s shown will depend on the type of weld.
Reading Weld Size on Welding Symbols
The dimensions indicating the weld’s size are displayed to the left of the weld symbol, while the length of the weld is demonstrated on the symbol’s right.
In the absence of a specified length, the welding symbol refers to the part of the joint that lies between abrupt direction changes in the welding process or between defined dimension lines.
When a welding symbol appears on both sides of the reference line, measurements must be provided for each weld, even if they are identical in nature.
The size of a weld is generally measured in inches or millimeters and is displayed to the left of the weld symbol (the symbol that denotes the type of weld).
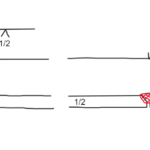
Fillet Welds: For fillet welds, the size is the length of the legs (the two sides that form a right angle) as shown in above figure. The size is written to the left of the fillet weld symbol. If the weld is to be the same size on both sides, only one number is given. If the legs are to be different lengths, two numbers will be provided.
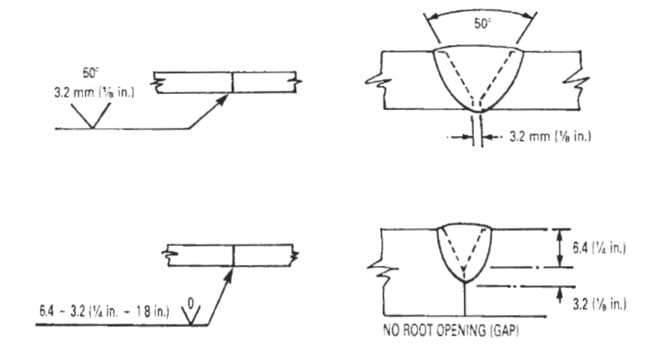
Groove Welds: The size of a groove weld is the depth of the groove, and it’s displayed to the left of the groove weld symbol. It may be given as a specific dimension, or it may be “C” for complete penetration.
Square or Scarf Welds: The size of these welds is the depth of the weld, and it’s displayed to the left of the weld symbol.
Plug or Slot Welds: The size of these welds is the diameter of the hole or slot, and it’s displayed above or below the symbol.
Remember, the weld size is always given in the same units (inches or millimeters) as the rest of the drawing. If no units are given, refer to the overall drawing notes to determine the correct units.
Conclusion
Understanding how to read welding symbols, including weld size, is a critical skill for anyone involved in welding and fabrication. It ensures clear communication, reduces errors, and promotes a safer, more efficient workplace. While it can seem complicated at first, with practice, you’ll be able to quickly and accurately interpret these symbols.
Remember, if you’re ever unsure about a symbol or notation, don’t guess. Always ask for clarification to prevent costly mistakes or, worse, safety issues. Happy welding!
Dr. Kumar is a PhD-qualified Welding and Materials Expert with a career spanning 18+ years across metallurgy and NDT. A triple-threat in the industry, he is an IWE, AWS-CWI, and ASNT NDT Level III certified professional. Dr. Kumar is the author of several leading technical resources and is a premier specialist in welding symbol instruction, dedicated to improving global standards in welding engineering and inspection.
Dr. Kumar is a PhD-qualified Welding and Materials Expert with a career spanning 18+ years across metallurgy and NDT. A triple-threat in the industry, he is an IWE, AWS-CWI, and ASNT NDT Level III certified professional. Dr. Kumar is the author of several leading technical resources and is a premier specialist in welding symbol instruction, dedicated to improving global standards in welding engineering and inspection.