Edge joint welding definition An edge welding symbol is a graphical symbol used in welding to indicate the type of weld that is required on an edge joint between two pieces of metal. The symbol …
An edge welding symbol is a graphical symbol used in welding to indicate the type of weld that is required on an edge joint between two pieces of metal. The symbol is typically used on engineering drawings and blueprints to communicate the welding requirements to the welder.
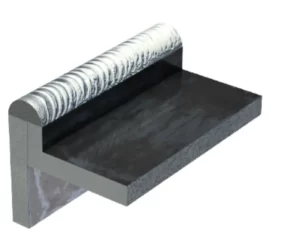
Edge welding is a type of welding process used to join two metal parts along their edges. In this process, the edges of the two parts to be joined are brought into contact with each other and heated until they melt and fuse together. The heat required for welding is usually generated by an electric arc or a gas flame.
Edge welding is commonly used in the fabrication of metal structures like bridges, buildings, and vehicles. It is also used in the production of pipes, tanks, and other cylindrical structures. Edge welding is preferred in cases where the thickness of the metal parts is relatively thin, typically ranging from 0.5 mm to 10 mm.However, thick members can also be joined using Edge Welding.
One of the key advantages of edge welding is that it produces a strong and durable joint that can withstand high levels of stress and strain. Additionally, this type of welding creates a smooth and seamless finish that is aesthetically pleasing. However, edge welding does require a high degree of skill and precision in order to achieve consistent and reliable results.
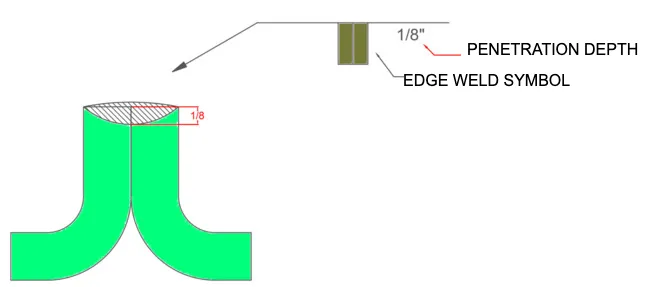
Edge welding is typically utilized on thin sheet metals or gauge metals. This welding technique can be applied to join two sheets along their edge or to join multiple sheet metals. The depth of penetration, length of weld, and spacing between welds can all be specified using an Edge Welding Symbol as shown in below example.
Edge joint welding application
The main of Edge Joint Welding applications are:
Fabrication of metal structures such as bridges, buildings, and vehicles
Production of pipes, tanks, and cylindrical structures
Manufacturing of metal furniture and appliances
Repair of metal parts and components
Construction of metal frames and supports for doors and windows
Creation of metal artwork and sculptures
Welding of automotive body panels and frames
Joining of sheet metal for HVAC ductwork and other applications
Manufacturing of metal containers and packaging materials.
Edge joint welding procedure
Edge joint welding is a common technique used in the fabrication industry to join two pieces of metal along their edges. The procedure can involve different welding methods, including MIG (Metal Inert Gas), TIG (Tungsten Inert Gas), or stick welding. Each method requires a slightly different approach.
Below is a general procedure for creating an edge joint weld:
Safety First:
Always start with safety. Wear the appropriate PPE (Personal Protective Equipment) that includes welding helmet, gloves, safety shoes, and flame-resistant jacket. Make sure your work area is well-ventilated, and there are no flammable materials nearby.
Preparation:
Clean the Metal: Before you begin welding, the surfaces of the metals should be clean. Use a wire brush or grinder to remove any rust, paint, or other contaminants from the surface.
Align the Edges: The two pieces of metal should be aligned along their edges. They should be touching, but a small gap (approximately 1/16″ to 1/8″) can help achieve a better weld especially in full penetration welds.
Secure the Workpieces: Use clamps to secure the workpieces to prevent them from moving during the welding process.
Welding:
Set up the Welding Machine: Your welding machine should be set up according to the manufacturer’s instructions, and the settings should be adjusted based on the type and thickness of the metal you’re welding.
Tack Welds: Apply small tack welds at the beginning, middle, and end of the joint. These will keep the pieces aligned during the main welding process.
Welding Process: Starting at one end of the joint, create a consistent, even weld along the seam. Keep a steady speed to ensure the weld is of even depth throughout.
Inspect the Weld: After welding, always inspect your weld. A good weld should be even, without any gaps or bubbles.
Clean the Weld: Use a wire brush to clean off any slag from the weld.
Dr. Kumar is a PhD-qualified Welding and Materials Expert with a career spanning 18+ years across metallurgy and NDT. A triple-threat in the industry, he is an IWE, AWS-CWI, and ASNT NDT Level III certified professional. Dr. Kumar is the author of several leading technical resources and is a premier specialist in welding symbol instruction, dedicated to improving global standards in welding engineering and inspection.
Dr. Kumar is a PhD-qualified Welding and Materials Expert with a career spanning 18+ years across metallurgy and NDT. A triple-threat in the industry, he is an IWE, AWS-CWI, and ASNT NDT Level III certified professional. Dr. Kumar is the author of several leading technical resources and is a premier specialist in welding symbol instruction, dedicated to improving global standards in welding engineering and inspection.